
Monday, September 23, 2013
Purple Candied Apples with Tutorial
I have moved!
Please come over to thekitchenmccabe.com for this recipe.
Thursday, August 22, 2013
Monday, August 5, 2013
Farfalle with Crispy Pancetta, Heirloom Tomatoes in a White Wine GarlicCream
I've Moved! Get this recipe at my new site here.
Saturday, July 20, 2013
Monday, July 15, 2013
Fresh Orange Vinaigrette

Fresh Orange Vinaigrette
Ingredients
- 1/3 c. Olive Oil
- 1/3 c. Canola Oil
- 1/3 c. White Sugar(or Stevia in the Raw)
- 1/3 c. Orange Juice, fresh
- 2 T. Rice Wine Vinegar
- 1/2 t. Sea Salt
- 1/2 t. Freshly Ground Pepper
- 2 T. Sweet Onion(just eyeball a slice)
- 1 drop Lemon Oil
- 5 drops Orange Oil
Directions
- Place all ingredients in a blender and blend until everything is completely emulsified. Store in the refrigerator.
*Use 2 t. Of lemon juice instead if you don't have lemon oil.
*do try and find Orange Oil if you can, it adds so much flavor to the dressing that you can't get any other way! I use Wild Orange Oil by doTERRA
*If you will be storing the dressing in the refrigerator for more than a few days you will need to add another drop or two of orange oil the next time you serve it. Cold causes the oil's flavor to dissipate.

Thursday, July 11, 2013
Simple Chocolate Mousse with Chocolate Pearls

Serve a little dish of thick whipped cream on the side of the mousse to make this treat exceptional.
Make this mousse a little lighter by subbing Stevia for the sugar and using coconut milk in the custard instead of heavy cream. I would still use heavy cream for the remaining 1 1/4 c. Cream or you will loose the mousse texture and consistency.
Ingredients:
- 2 cups Heavy Cream
- 4 Egg Yolks
- 3 T. Sugar
- pinch of Salt
- 1 t. Vanilla Extract
- 7 oz. Semi-sweet Chocolate chips
4 T. Callebaut chocolate pearls(Verhona makes wonderful chocolate pearls as well)
In a microwave safe bowl, melt the chocolate chips and stir until smooth.
Pour the custard through a small sieve into the melted chocolate chips. Stir the custard and chocolate until well blended and smooth. Let cool.
Whip the remaining 1 1/4 cups of heavy cream until stiff peaks form. Add 1/4 of the whipped cream to the chocolate custard and whisk in well to lighten the mixture. Add the remaining whipped cream to the lightened custard and very carefully fold in until the mixture is well combined.
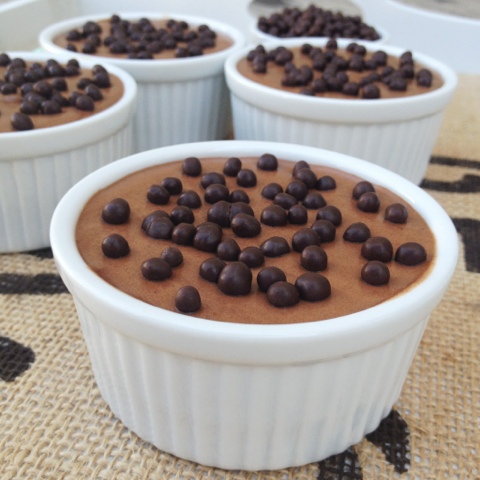
Spoon the mousse into 8 ramekins and smooth the tops. Sprinkle 1/2 T. Of pearls over the top of each dish. Refrigerate the mousse for several hours, until firmly set and chilled.
Serve cold with whipped cream on the side.

Wednesday, July 10, 2013
Gold & Red Beet Salad with Orange, Chèvre, Mint, & Fresh OrangeVinaigrette

I love beets. LOVE them. You may not be as big a fan, and that's ok. But maybe give this recipe a try. I've seen it turn a few haters into believers. Maybe it's the goats cheese, maybe it's the vinaigrette, I'm not sure. But one thing is for certain and that is that all these ingredients belong together.
*If you can't find golden beets, try a natural foods market like Sprouts or Whole Foods.

4 golden beets
4 red beets
3 oranges, skinned and sectioned
1/4 C. Chèvre(goats cheese), crumbled
4-5 Fresh Mint Leaves, chopped
Kosher salt and pepper, to taste
Fresh Orange Vinaigrette, to taste
Wrap each beet in tin foil and place on a baking sheet. Roast at 400 degrees for 30-50 minutes depending on size of beets. Remove from oven when beets are tender. Let beets sit for 30 minutes or so(this will allow the skins to steam and 'slip off'). Peel the beets and slice into wedges.
Arrange the beets in rows on a platter, along with the segmented oranges.
Add salt an pepper to taste.
Sprinkle the goats cheese crumbles and mint evenly over the beets.
Drizzle the vinaigrette over the beets(add as much or little as you like) and serve immediately.
If you will not be serving the salad right away keep it in the fridge and pour the vinaigrette over the beets right before service.

Subscribe to:
Posts (Atom)